Creating an account for tracking and subscription
In this JungleMail tutorial, you will learn how to add a new JungleMail user (account) and assign the necessary permissions.
Before you begin
Before creating a tracking and subscription account, it is necessary to create an external site collection with anonymous access.
Key terms
- Main site collection is the site collection where EnovaPoint JungleMail Core is activated. It is the site collection from which you will be sending emails.
- External site collection is the site collection where JungleMail Publishing Web Parts feature is activated. This site collection is used for tracking and subscription features only.
Please mind these terms to avoid making changes in the wrong site collection and malfunctioning of JungleMail.
To create an account
1. Create a separate user in Active Directory to access the main site collection (the one that you will be using to send emails from). User name could be Domain\JMuser and user account should be a member of the Domain Users group. Speaking of Group Policy, you might want to ensure that your domain service accounts are denied the Log on Locally user right at the very least. This action will prevent a malicious user from succeeding in an interactive login attempt by using a breached service account.
2. In the main site collection, create a new Permission Level for the newly created account. This will ensure this account will only have access to access JungleMail Service and do not has access to parent lists or libraries of that site collection.
To start creating the permission, go to the main site collection and click Site Settings > Site Permissions > Permission Levels.
 4. Click Add a Permission Level.
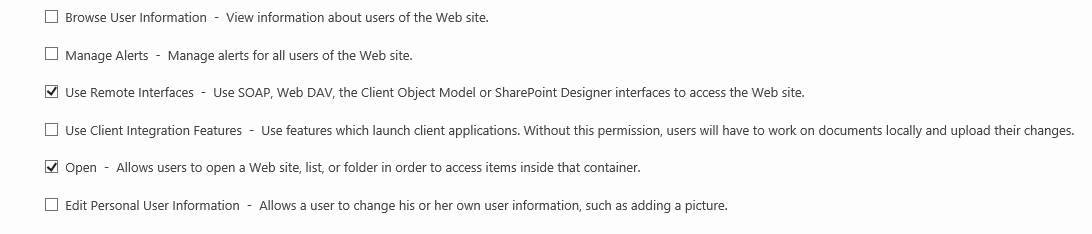
 5. Check the Use Remote Interfaces and Openboxes and save this custom permission level under an easy-to-understand name, e.g., JungleMailWebPartsPrivileges.
 6. In the main site collection, go to Site Settings > Site Permissions > Grant Permissions and assign the newly created permission level to the user created in Step 1 ( Domain\JMuser).
- JungleMail Subscribers - View, Add and Edit items permissions
- JungleMail Topics - Read permission level
- JungleMail Jobs - Read permission level
Tracking-related lists and permissions
- JungleMail History - Read permission level
- JungleMail Tracker Links - Read permission level
- JungleMail Tracker Actions - View, Add permissions
Notes
-
You should break the permission inheritance or set unique permissions for the lists above.
-
If you are using JungleMail Enterprise with enabled SQL mode, it is not necessary to assign permissions to JungleMail History, JungleMail Tracker Links and JungleMail Tracker Actions because links and actions (link clicks, opens and unsubscribes) are saved in the JungleMail SQL Database tables instead of SharePoint lists.
Next step
The next step depends on whether you want to configure tracking functionality or subscription functionality on JungleMail.
1a. To finish tracking configuration, configure tracking on external site collection.
1b. To complete subscription configuration, configure subscription functionality.